
Scratching my proverbial technical itch – That’s what led me to poke under the Nutanix platform covers to see how Nutanix platform is different than VMware vSphere from a Storage perspective.
Business Critical Oracle Workloads have stringent IO requirements and enabling, sustaining, and ensuring the highest possible performance along with continued application availability is a major goal for all mission critical Oracle applications to meet the demanding business SLAs.
This blog is an attempt to investigate my lab setup of Nutanix AHV/CVM & understand how storage is presented to & consumed by Oracle workload VM’s and why features like Data Locality, iSCSI redirects on CVM failure, PCI Pass through to CVM etc. are critical to Business Critical Oracle Workloads.
Disclaimer – This is not an official Nutanix blog – just my private investigation in my lab environment, to get a better understanding how Nutanix platform works under the covers, having worked in the VMware space for 12+ years as the Global Oracle Practice Lead and now currently working for Nutanix as an Sr OEM System Engineer.
Nutanix Platform
Nutanix AOS is the operating system for Nutanix’s hyper-converged infrastructure (HCI) platform, which includes the Acropolis Hypervisor (AHV) and a Controller Virtual Machine (CVM).
In AHV deployments, the Controller VM (CVM) runs as a VM and disks are presented using PCI passthrough.
This allows the full PCI controller (and attached devices) to be passed through directly to the CVM and bypass the hypervisor.
This is advantageous to business-critical Oracle workloads where storage plays an important part of the database performance.

https://www.nutanixbible.com/5a-book-of-ahv-architecture.html
Nutanix AOS distributed storage fabric ensures consistent performance, even during peak loads. It optimizes performance differently from vSAN, in that AOS ensures a VM’s production data blocks are always on the same node that hosts it – this is called Data Locality and enables serving data at PCI bus speeds.
This feature is extremely critical to business-critical Oracle workloads where storage plays an important part of the database performance.
More information on Nutanix AHV, AOS & CVM can be found at The Nutanix Cloud Bible
Lab Setup
The Lab setup consisted of a Nutanix Cluster AHV 10.0.1.1, 4 Dell XC6420-6 Servers, each server with 2 socket, 32 cores and 768GB RAM.
Each AHV node has 2 x 450GB NVMe performance drives and 4 x 1.8 TB SSD for capacity.
Nutanix Cluster is shown as below.

The Nutanix Cluster with 4 servers is shown as below.

Server ‘PHX-POC270-2’ socket, cores & memory specifications are shown as below.
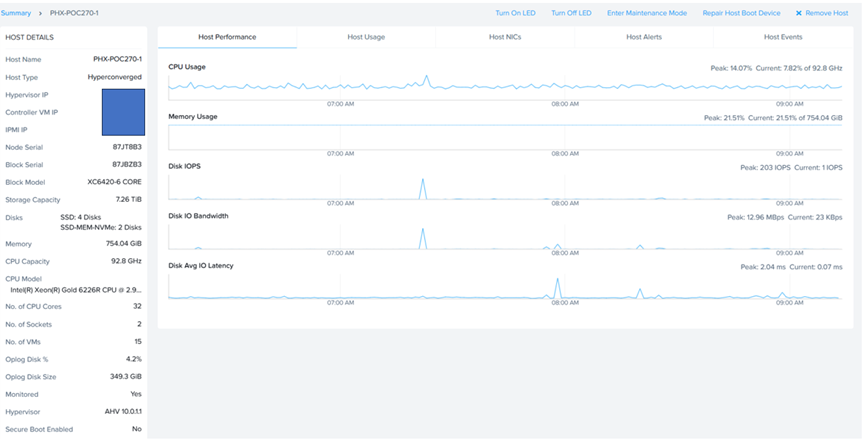
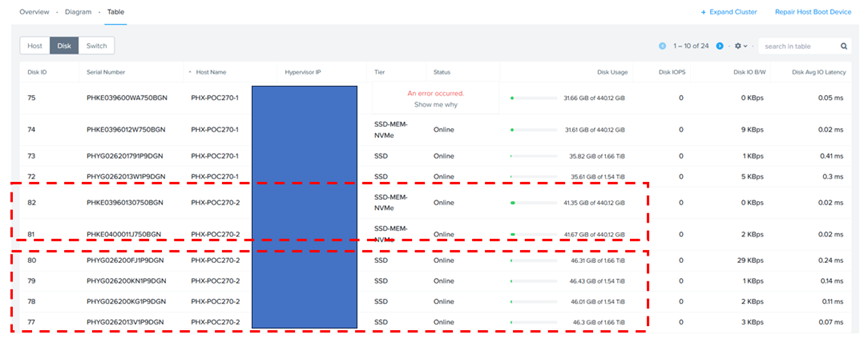
Server ‘PHX-POC270-2’ storage specifications are shown as below. Remember, each server has 4 x 1.8 TB SSD and 2 x 450GB SSD.
AHV & CVM Storage
Each AHV node has 2 x 450GB NVMe performance drives and 4 x 1.8 TB SSD for capacity.
In Nutanix, /dev/spdk is a user-space file in the CVM where NVMe devices are presented to the Blockstore service via the Storage Performance Development Kit (SPDK).
This integration bypasses the Linux kernel’s filesystem drivers and context switches, allowing direct I/O between the CVM’s Stargate process and NVMe devices, resulting in lower latency and improved performance for applications.
More details can be found at Blockstore Support with SPDK , Nutanix Core Performance and Blockstore and Storage Performance Development Kit.
In CVM, we see 2 x 450GB NVMe performance drives.
root@NTNX-87JBZB3-D-CVM:X.X.X.X:/home/nutanix# ll /dev/spdk/*
crw——-. 1 root root 242, 0 Oct 2 22:41 /dev/spdk/nvme0
crw——-. 1 root root 241, 0 Oct 2 22:41 /dev/spdk/nvme0n1
crw——-. 1 root root 240, 0 Oct 2 22:41 /dev/spdk/nvme1
crw——-. 1 root root 239, 0 Oct 2 22:41 /dev/spdk/nvme1n1
root@NTNX-87JBZB3-D-CVM:X.X.X.X:/home/nutanix#
In CVM, running the ‘lsblk’ command lists block devices like disk drives and their partitions in a tree-like structure to show their hierarchy and mount points.
The ‘lsblk’ command shows us 4 x 1.8 TB SSD for capacity.
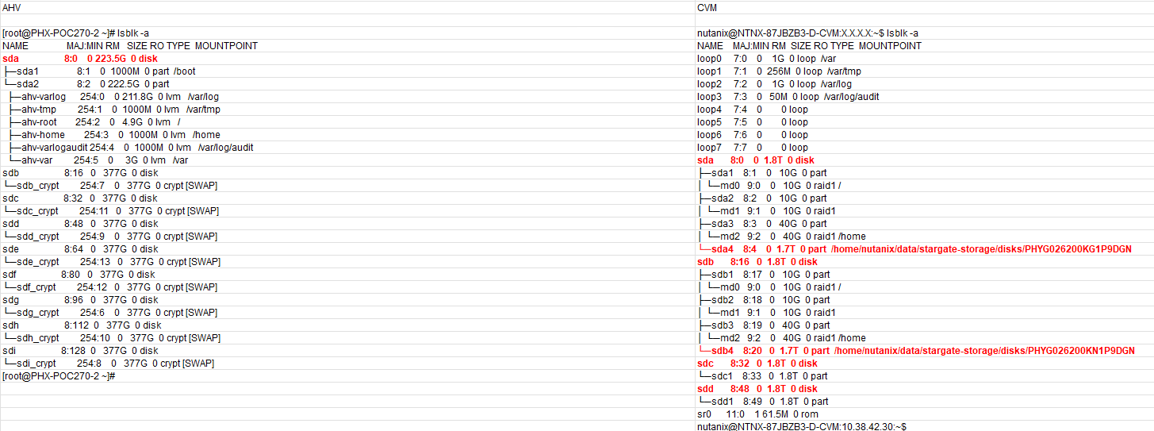
In AHV deployments, the Controller VM (CVM) runs as a VM and disks are presented using PCI passthrough. This allows the full PCI controller (and attached devices) to be passed through directly to the CVM and bypass the hypervisor.

Looking at AHV Node and CVM Networking – the default AHV configuration includes an OVS bridge called br0 (in this case IP 10.38.42.26) and a native Linux bridge called virbr0 (in this case IP 192.168.5.1).
The virbr0 Linux bridge carries management and storage communication between the CVM and AHV host.
To streamline the management of CVMs and AHV hosts, the SSH shortcut connects a single CVM directly to the local AHV host. From any single CVM, you can use SSH to connect to the AHV host’s local address at IP address 192.168.5.1.
Similarly, any AHV host can SSH to the local CVM using the static IP address 192.168.5.254. Because the address 192.168.5.2 on a CVM is used for dynamic high availability purposes in the AHV host, it may not always direct to the local CVM. This SSH connection uses the internal Linux bridge virbr0.

More details can be found at Nutanix AHV Networking Best Practices.
In the default unsegmented network in a Nutanix cluster (AHV), the Controller VM has two virtual network interfaces—eth0 and eth1. Interface eth0 (IP X.X.X.X) is connected to the default external virtual switch, which is in turn connected to the external network through a bond or NIC team that contains the host physical uplinks.
Interface eth1 (IP 192.168.5.2) is connected to an internal network that enables the CVM to communicate with the hypervisor.
CVM local Stargate is shown via its 192.168.5.254 internal address.

VM Storage
AHV disks are presented using PCI passthrough, allowing for the full PCI controller (and attached devices) to be passed through directly to the CVM and bypassing the hypervisor – similar to RDM in the VMware land, which allowed VM’s to bypass the VMKernel layer / vSCSI layer & able to access raw disks.
How are AHV vdisks / virtual disks attached to VM’s – I found a very simple explanation on Nutanix Community – https://next.nutanix.com/how-it-works-22/how-does-cvm-handles-data-43474
- The VM disks are residing in Container (container is basically storage policy construct)
- On AHV the disks are actually mounted as iSCSI to VMs (target of that iSCSI is CVM stargate service)
- When the VMs write the data, the IO is interfaced to stargate in CVM, then the magic happens there (IO optimization, coalescence, compression, deduplication, RF, EC-X, etc.)
- The CVM writes the data to Physical Media (NVME, SSD, HDD) directly as the HBA/Disk controller/NVMe disks are mounted to CVM as passthrough.
More details can be found at AOS Storage & How Nutanix AHV Works.
VM ‘BD-LinuxVM’ is taken as an example here with 1 virtual disk of size 20G.
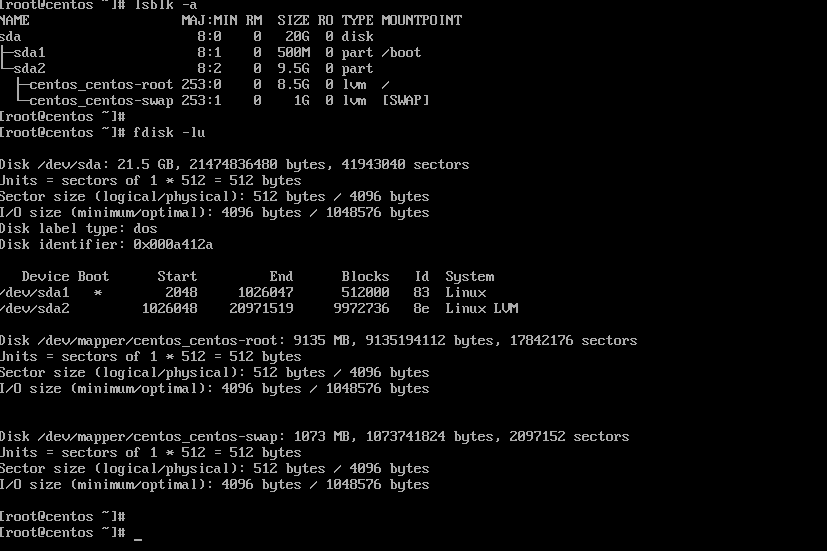
Using acli command, we get the specifications of the VM ‘BD-LinuxVM’
nutanix@NTNX-87JBZB3-D-CVM:x.x.x.x:~$ acli vm.get BD-LinuxVM
BD-LinuxVM {
can_clear_removed_from_host_uuid: True
config {
agent_vm: False
allow_live_migrate: True
apc_config {
apc_enabled: False
}
bios_uuid: “0d9e465f-ae70-4b43-ab7a-5d4f3f905e50”
boot {
boot_device_order: “kCdrom”
boot_device_order: “kDisk”
boot_device_order: “kNetwork”
hardware_virtualization: False
secure_boot: False
uefi_boot: False
}
cpu_hotplug_enabled: True
cpu_passthrough: False
disable_branding: False
disk_list {
addr {
bus: “scsi”
index: 0
}
cdrom: False
container_id: 1880
container_uuid: “2a4c7da6-ad3d-48ae-bad5-91af1bc76c07”
device_uuid: “1cd2b8c4-1de3-45cf-8c31-2196fda0534d”
naa_id: “naa.6506b8d7bb97390b54fd994979d76395”
source_vmdisk_uuid: “2b4dddf8-8cd4-421b-8f2d-813c0798d8f5”
storage_vdisk_uuid: “4ba96ab3-ac5f-401b-a580-0873e3fb8649”
vmdisk_size: 21474836480
vmdisk_uuid: “5c8ad007-8968-4283-a2a6-0f41069ad41a”
}
generation_uuid: “6883238d-b81d-4210-9ce9-dd729cac61cb”
gpu_console: False
hwclock_timezone: “UTC”
machine_type: “pc”
memory_mb: 4096
memory_overcommit: False
name: “BD-LinuxVM”
ngt_enable_script_exec: False
ngt_fail_on_script_failure: False
nic_list {
connected: True
external_attr_list {
key: “iface-id”
value: “port_c4f401b4-30df-4527-b02e-4cf2c1719925”
}
mac_addr: “50:6b:8d:7e:fa:95”
network_name: “BD-Subnet”
network_type: “kAtlasNetwork”
network_uuid: “8db8039a-d2d8-4d90-9541-6bfc4db7d7b0”
queues: 1
rx_queue_size: 256
type: “kNormalNic”
uuid: “9b7f11d2-790c-4fc9-8de6-af742f75547c”
vlan_mode: “kAccess”
}
num_cores_per_vcpu: 1
num_threads_per_core: 1
num_vcpus: 2
num_vnuma_nodes: 0
power_state_mechanism: “kHard”
scsi_controller_enabled: True
vcpu_hard_pin: False
vga_console: True
vm_type: “kGuestVM”
vtpm_config {
is_enabled: False
}
}
cpu_model {
name: “Intel Cascadelake”
uuid: “3de0461e-6313-5e1e-b576-976f5a5308d4”
vendor: “Intel”
}
cpu_model_minor_version_uuid: “19eb294e-16ea-4001-8069-6f45e806c122”
host_name: “Y.Y.Y.Y”
host_uuid: “5bf07516-d8d6-48da-92d4-a18a382f6eb1”
is_ngt_ipless_reserved_sp_ready: True
is_rf1_vm: False
logical_timestamp: 6
protected_memory_mb: 4096
state: “kOn”
uuid: “0d9e465f-ae70-4b43-ab7a-5d4f3f905e50”
}
nutanix@NTNX-87JBZB3-D-CVM:X.X.X.X:~$
An abridged version of the same command gives the vmdisk_uuid (“5c8ad007-8968-4283-a2a6-0f41069ad41a”)
nutanix@NTNX-87JBZB3-D-CVM:X.X.X.X:~$ acli vm.get BD-LinuxVM include_vmdisk_paths=1 | grep -E ‘disk_list|vmdisk_nfs_path|vmdisk_size|vmdisk_uuid’
disk_list {
source_vmdisk_uuid: “2b4dddf8-8cd4-421b-8f2d-813c0798d8f5”
vmdisk_nfs_path: “/default/.acropolis/vmdisk/5c8ad007-8968-4283-a2a6-0f41069ad41a”
vmdisk_size: 21474836480
vmdisk_uuid: “5c8ad007-8968-4283-a2a6-0f41069ad41a”
nutanix@NTNX-87JBZB3-D-CVM:X.X.X.X:~$
We can run the ‘allssh ‘links –dump http://0:2009/iscsi‘’ command to gather detailed, raw iSCSI session information from all Controller Virtual Machines (CVMs) in a Nutanix cluster and narrow it down to the vmdisk_uuid of interest.

The virtual disk with uuid: “5c8ad007-8968-4283-a2a6-0f41069ad41a” is currently being served by CVM3 via iSCSI Protocol.
Storage I/O Path
From the How Nutanix AHV Works
AHV does not leverage a traditional storage stack like ESXi or Hyper-V. Each AHV host runs an iSCSI redirector which regularly checks the health of Stargates throughout the cluster, local Stargate on 192.168.5.254 internal address.
QEMU is configured with the iSCSI redirector as the iSCSI target portal. Upon a login request, the redirector will perform an iSCSI login redirect to a healthy Stargate (preferably the local one).
In the event where the active Stargate goes down (thus failing to respond to the NOP OUT command), the iSCSI redirector will mark the local Stargate as unhealthy. When QEMU retries the iSCSI login, the redirector will redirect the login to another healthy Stargate.
Once the local CVM’s Stargate comes back up (and begins responding to the NOP OUT commands), the remote Stargate will quiesce then kill all connections to remote iSCSI sessions. QEMU will then attempt an iSCSI login again and will be redirected to the local Stargate.
The iSCSI redirects are very critical to business critical Oracle workloads uptime as its seamless with no interruption to Oracle workload processing.
Summary
We can definitely see a lot of advantages for business-critical Oracle workloads on Nutanix
- AHV disks are presented using PCI passthrough to the CVM which allows for full PCI controller (and attached devices) to be passed through directly to the CVM and bypass the hypervisor – raw performance of storage device
- Oracle workloads benefit from Data Locality, where the storage for a VM is placed on the same node as the VM itself to optimize performance
- Load balancing of vDisks in a Volume Group (VG) which enables IO-intensive Oracle VMs to use the storage capabilities of multiple Controller VMs (CVMs), a much-needed boost for large Oracle workloads with high throughput needs
- iSCSI redirect from AHV to other CVMs in the cluster, in event of the local CVM failure, which is seamless with no interruption to Oracle workload processing
Recent announcements were made regarding partnerships in External storage space with Dell & Pure Storage culminating in release of Nutanix Cloud Platform (NCP) with Dell PowerFlex & NCP with Pure Storage.
This now adds more storage options for workloads to the Nutanix Storage stack which had HCI and HCI using both storage-only (SO) and compute-only (CO) nodes for licensing optimization.
Best Practices for running Oracle workloads on Nutanix can be found at Oracle on Nutanix Best Practices
Conclusion
Business Critical Oracle Workloads have stringent IO requirements and enabling, sustaining, and ensuring the highest possible performance along with continued application availability is a major goal for all mission critical Oracle applications to meet the demanding business SLAs.
This blog is an attempt to investigate my lab setup of Nutanix AHV/CVM & understand how storage is presented to & consumed by Oracle workload VM’s and why features like Data Locality, iSCSI redirects on CVM failure, PCI Pass through to CVM etc. are critical to Business Critical Oracle Workloads.
Disclaimer – This is not an official Nutanix blog – just my private investigation in my lab environment, to get a better understanding how Nutanix platform works under the covers, having worked in the VMware space for 12+ years as the Global Oracle Practice Lead and now currently working for Nutanix as an Sr OEM System Engineer.

You must be logged in to post a comment.